Define the DeFi use case and technical requirements
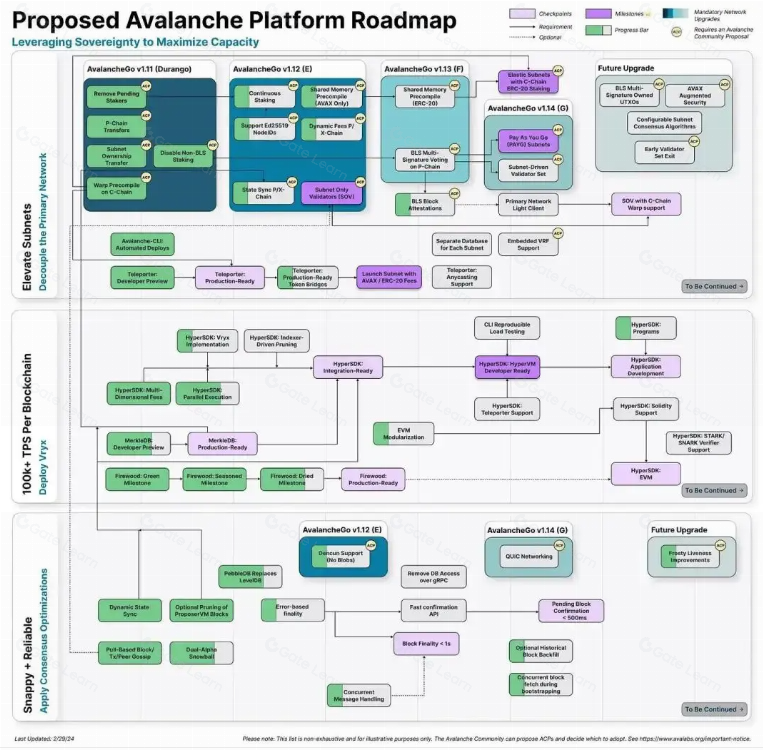
Before writing a single line of code, you need to lock down exactly what your Avalanche subnet-based DeFi cluster will do. A subnet is essentially a set of validators that can enforce its own rules for one or more blockchains [src-serp-1]. This sovereignty is powerful, but it means you are responsible for every technical decision from the ground up.
Start by identifying the specific financial primitive you want to build. Are you creating a high-frequency trading venue, a private lending protocol, or a tokenized asset platform? Your choice dictates the consensus mechanism and the Virtual Machine (VM) type you will deploy.
For most DeFi applications, the Subnet-EVM is the standard choice. It offers full compatibility with Ethereum tooling like Hardhat and Foundry, allowing you to deploy existing Solidity smart contracts with minimal changes. If your project requires custom state management or high-throughput consensus that the EVM cannot handle, you might consider the Coreth or a custom VM, but this adds significant development complexity.

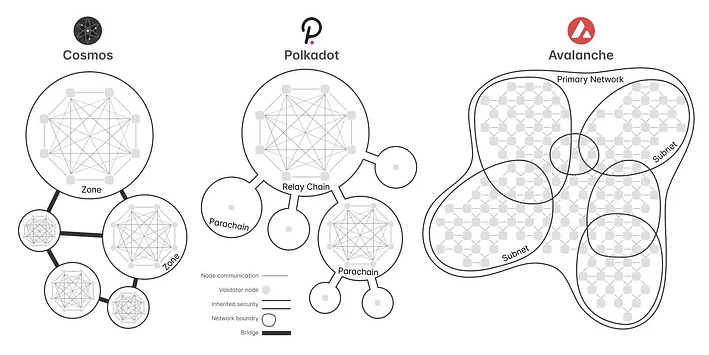
Finally, map out your interoperability needs. While subnets are sovereign, they can communicate with the C-Chain and P-Chain through native asset bridges. Decide early which assets will flow in and out, as bridge design is a critical security component for any DeFi cluster. Clear technical requirements now prevent costly refactoring later.
Set up the development environment
Building a subnet-based DeFi cluster requires a precise local setup. You need the Avalanche CLI to manage subnet definitions and a local node to simulate the network before mainnet deployment. This section walks you through installing the tools and initializing the project directory.
Run the official installation script to download the Avalanche CLI. This tool is the primary interface for defining subnet configurations and managing the node lifecycle. Verify the installation by running avalanche version to ensure the binary is accessible in your terminal.

Create a new directory for your DeFi cluster and initialize it with avalanche init. This command sets up the standard folder structure, including the config.json file where you will define your subnet parameters. Keep this directory clean to avoid configuration conflicts during deployment.
Set up a local Avalanche node to test your subnet in isolation. Use avalanche blockchain create to generate the subnet configuration, then start the node with avalanche node start. This step allows you to validate your DeFi smart contracts and subnet logic without risking mainnet assets.


As an Amazon Associate, we may earn from qualifying purchases.
Create and configure the subnet
You are building the foundation for your Avalanche Subnet-Based DeFi cluster. This step involves initializing the blockchain configuration and defining the genesis state. A subnet is essentially a permission layer that secures one or more blockchains, allowing you to tailor consensus rules to your specific DeFi needs. We will use the official Avalanche CLI to generate the necessary files.
Run the avalanche subnet create command followed by your desired subnet name. This command scaffolds the directory structure and generates the initial configuration files required for your custom blockchain. Ensure you are in your project root directory before executing this command to keep your workspace organized.
Edit the genesis.json file to set your initial validator set and token distribution. For a DeFi cluster, you might want to pre-fund specific liquidity provider addresses or set custom initial supply parameters. This file defines the starting state of your blockchain, so precision here is critical for the security and economic model of your cluster.
Open the subnet-evm.json (or relevant VM config) to define consensus parameters such as block gas limits and fee market settings. These settings dictate how transactions are processed and validated. Adjusting these parameters allows you to optimize for the high-throughput requirements typical of DeFi applications, ensuring your subnet can handle transaction volume without congestion.
Before deploying to mainnet or testnet, run avalanche subnet deploy with the --local flag to simulate the launch. This step checks for syntax errors in your genesis and configuration files and ensures your validator nodes can initialize correctly. Catching configuration errors here saves significant time and prevents costly failures during the actual subnet launch.
Once the local validation passes, you are ready to proceed to the next phase: deploying the subnet to the Avalanche network and connecting your DeFi smart contracts. The configuration you have created now serves as the immutable rulebook for your cluster's operation.
Integrate DeFi protocols and assets
Your subnet is live, but it’s just an empty shell until you populate it with liquidity and functionality. This section covers the two paths to that goal: integrating existing DeFi primitives or deploying custom smart contracts. Since you’re building a high-stakes financial cluster, the integration layer is where security and performance converge.
Connect existing DeFi primitives
If you want to bootstrap liquidity quickly, connecting established DeFi protocols is the fastest route. This typically involves wrapping existing assets or bridging liquidity pools to your subnet’s virtual machine. Avalanche’s architecture allows subnets to interact with the C-Chain, meaning you can leverage existing liquidity without starting from zero.
- Bridge Assets: Use the official Avalanche Bridge to move assets from the C-Chain to your subnet. This ensures your users can deposit familiar tokens like USDC or WETH immediately.
- Integrate Oracles: DeFi protocols rely on price feeds. Connect a trusted oracle network (like Chainlink or Pyth) to your subnet to provide real-time price data for your lending or trading pairs.
- Deploy AMM Pools: If you’re building a DEX, deploy an Automated Market Maker contract that interacts with your bridged assets. Ensure the contract is verified on the subnet’s explorer for transparency.
This approach minimizes development time but requires careful configuration to ensure your subnet’s consensus rules align with the external protocols you’re connecting. Any mismatch in block times or finality can lead to failed transactions or arbitrage opportunities.
Deploy custom smart contracts
For full control over your DeFi cluster, deploying custom smart contracts is the standard path. This allows you to implement unique tokenomics, governance models, or specialized lending mechanisms that off-the-shelf protocols don’t support.
- Write and Test: Develop your contracts using Solidity or Vyper. Run extensive unit tests and formal verification, especially if you’re handling large sums of capital. Security audits are non-negotiable here.
- Deploy to Subnet: Use your subnet’s RPC endpoint to deploy the contracts. Unlike the C-Chain, your subnet has its own transaction pool, so ensure your gas settings are optimized for your specific validator configuration.
- Initialize Parameters: Set up initial parameters like interest rates, collateral factors, or token supplies. These values will define the economic behavior of your DeFi cluster.
Custom contracts give you flexibility but demand rigorous testing. A single vulnerability in a DeFi contract can lead to total loss of funds, so treat this phase with the same caution as a mainnet launch on Ethereum.
Verify integration and security
Before inviting users, you must verify that your integrations are secure and functional. This isn’t just a technical check; it’s a financial safeguard.
- Testnet Simulation: Run a full simulation on a testnet subnet. Simulate high-volume trading, large withdrawals, and oracle price spikes to see how your contracts behave under stress.
- Audit Review: If you’ve commissioned an audit, review the findings thoroughly. Fix all critical and high-severity issues before mainnet deployment.
- Liquidity Check: Ensure your liquidity pools have sufficient depth to handle initial trades without excessive slippage. Thin liquidity can deter users and expose your protocol to manipulation.
Once verified, you can confidently open your DeFi cluster to users. The integration phase is about building trust through reliability and security, not just feature richness.
Test security and performance
Before going live, you need to prove your subnet can handle the heat. A DeFi cluster isn’t just code; it’s a financial instrument. If it breaks under load, users lose money. That’s not a bug; it’s a liability.
Start with stress testing. Avalanche subnets are built for speed, but your custom logic might not be. Use tools like avalanche-cli to simulate high-frequency transactions. Push your subnet to its breaking point. You need to know exactly where the latency spikes and where the consensus stalls. Don’t guess. Measure.
Next, audit your security configurations. This is where most teams cut corners. Ensure your node validators are properly signed and your access control lists are tight. A misconfigured subnet is an open door for attackers. Review the official Avalanche documentation for subnet security best practices to ensure you haven’t missed a critical setting.
Finally, run a private mainnet test. Invite a small group of trusted users to interact with your DeFi protocols. Watch their behavior. Look for unexpected gas spikes or failed transactions. This is your final safety net before the public sees your work.
-
Run load tests with simulated high-frequency transactions
-
Verify node validator signatures and access control lists
-
Conduct a private mainnet test with trusted users
-
Review official Avalanche subnet security guidelines
Common subnet deployment mistakes
Launching an Avalanche subnet for DeFi requires precision. A single misconfiguration can expose your cluster to exploits or liquidity fragmentation. Avoid these frequent errors by following this sequence.
Skipping the genesis config audit
Most failures stem from incorrect genesis parameters. Verify your validators, allocations, and chain_id against your testnet results before mainnet deployment. An incorrect chain_id can cause cross-chain messaging failures.
Ignoring gas price dynamics
Subnets have independent gas markets. If you set fixed gas prices too low, your subnet will stall during high traffic. Configure dynamic gas fees to match your target throughput. This prevents transaction backlogs during peak DeFi activity.
Overlooking subnet isolation
Subnets are isolated from the C-Chain. Ensure your bridge contracts are hardened and that your subnet’s validators are properly incentivized. Without proper isolation, a subnet crash can drag down the entire cluster.

Frequently asked questions about subnets
Launching a subnet involves specific technical and financial commitments. These answers address the most common hurdles for DeFi clusters.
No comments yet. Be the first to share your thoughts!